After talking to some guys in the #xulrunner channel on IRC, I foundout that my Mac applications were setup all wrong. At first I was like, why would they do that? But after getting it to work, I figured that it was pure genius! First of all, I was simply copying over my XUL app directly from my Linux box to a Mac, and then running it from Terminal:
//Library/Frameworks/XUL.framework/xulrunner-bin /path/to/app/application.ini
It worked, so I went with it. To install an app, you just add ‘–install-app’ to the end of ‘xulrunner-bin’, and it will stick it into the Applications folder. For some reason or another, Once it was installed, I could run it. But when I tried that same procedure on other machine, it didn’t work. Hmm. After some conversations, and reading, notice and article on MDC on Deploying XULRunner 1.8, and there was my answer.
Basically XULRunner on Mac has a different file structure, which is as follows:
MyApp.app/
- Contents/
- Info.plist
- Frameworks/
- XUL.framework/
- …all the XULRunner files
- Resources/
- application.ini
- icon.icns
- components/
- everything in your normal component directory
- chrome/
- everything in your normal chrome directory
- all your additional files and folders
- MacOS/
- xulrunner (the file copied from the ‘xulrunner’ stub, not the xulrunner-bin)
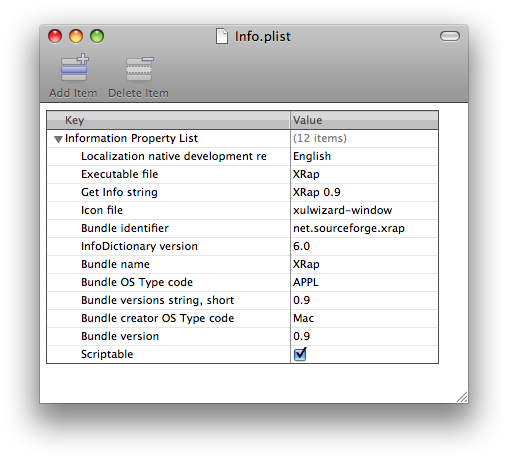
MyApp.app is actually a directory, with a ‘.app’ extension on it. All it did was create a directory, put all my files in the correct structure, add the ‘Info.plist’ file, and rename the directory with the ‘.app’ extension. The Info.plist file was probably the most complicated to recreate. The example from MDC is not very helpful, especially if you don’t know what your doing, and have to write it by hand. However there is a “Property List Editor” application on Mac, which will help you create the file.

Property List Editor
These are the properties which must be in your Info.plist file, for your XULRunner application to work. Key fields which are important are:
| Executable File | This is the name of the xulrunner stub file in the MacOS directory |
| Icon File | The name of your Icon in the Resources directory |
| Bundle name | Name of the .app directory |
The actually XML file looks like this:
<?xml version=“1.0” encoding=“UTF-8”?>
<!DOCTYPE plist PUBLIC “-//Apple//DTD PLIST 1.0//EN” “http://www.apple.com/DTDs/PropertyList-1.0.dtd”>
<plist version=“1.0”>
<dict>
<key>CFBundleDevelopmentRegion</key>
<string>English</string>
<key>CFBundleExecutable</key>
<string>XRap</string>
<key>CFBundleGetInfoString</key>
<string>XRap 0.9</string>
<key>CFBundleIconFile</key>
<string>xulwizard-window</string>
<key>CFBundleIdentifier</key>
<string>net.sourceforge.xrap</string>
<key>CFBundleInfoDictionaryVersion</key>
<string>6.0</string>
<key>CFBundleName</key>
<string>XRap</string>
<key>CFBundlePackageType</key>
<string>APPL</string>
<key>CFBundleShortVersionString</key>
<string>0.9</string>
<key>CFBundleSignature</key>
<string>Mac</string>
<key>CFBundleVersion</key>
<string>0.9</string>
<key>NSAppleScriptEnabled</key>
<true/>
</dict>
</plist>
Its best to do all your work in your application directory, before adding the .app extension, because then it is treated like a file, and you will be unable to enter the directory, unless you remove the extension.
In refactoring XRap, I was still able to access the directory even though it was a .app. Using nsIFile to add files (the License), and read the application.ini, with no problem. In packaging, using pkg-dmg script, I had to create a staging area (temporary directory) and copy the .app into it, because the script only accepts directories to be imaged. If I tried to image the .app, it would image it as a directory and add .dmg to the end, defeating the purpose.
Well now I am proud to say that Mac packaging is complete. You can now package an application as an dmg image. When a user downloads the image, all they need to do is mount it, and run your app.
I want to eat an apple now.![]()


