Well its been a long time coming, a lot of research, and a ton of learning, but here it is. XRap version 1.0. You can now successfully create a Windows Installer(msi) if you are working on Windows, a tarred bunzip2 (tar.bz2) archive if you are working on Linux, and an Apple Disk Image (dmg) if you are working on a Mac. I have worked out the bugs which I am aware of, but will definately still be working on any new ones that come up.
Here are the steps for each platform:
Windows:
- Open up XRap, and select the root of your XULRunner application directory, and click next.
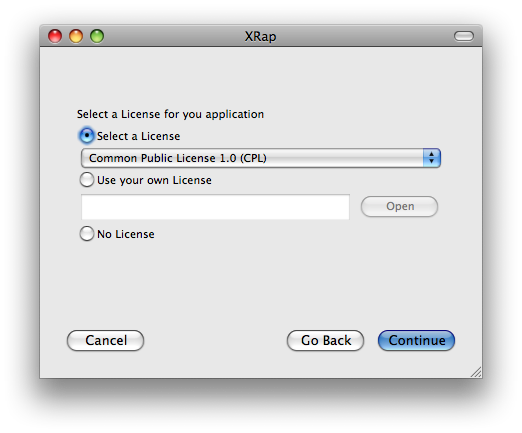
- Select the type of License you would like to attach to your application from the drop-down list of available licenses. You can optionally select your own license, or no license at all. Once you have selected your license option, click next
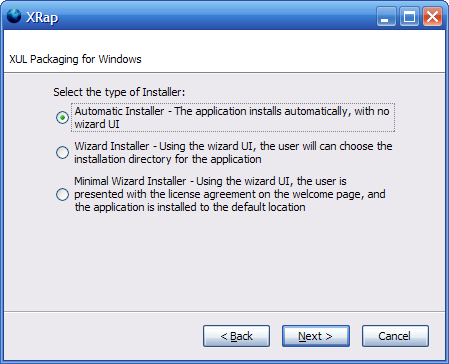
- You must now select the type of installer you would like your end-user to have.
- Automatic Installer – Will automatically install your application on to the end-user computer, with no wizard.
- Wizard Installer – Will start the Windows Installer wizard, showing your license agreement on a single page, and giving the option for the end-user to install your application to a custom path.
- Minimal Wizard Installer – Will start the Windows Installer wizard, using only one page, which shows the license agreement, then installs your application to the default directory.

- Once your have selected the type of installer you want, click next, and XRap will package your application
- When successfully completed, XRap will go to the last page where you can open the directory of where your new msi will be located, and your can close XRap.
Linux
- Open up XRap, and select the root of your XULRunner application directory, and click next.
- Select the type of License you would like to attach to your application from the drop-down list of available licenses. You can optionally select your own license, or no license at all. Once you have selected your license option, click next
- You can optionally select to create a zip file of your application for distribution on Windows. Click next to continue.
- XRap will now package your application into a tar.bz2, and optionally a zip file if selected.
- When successfully completed, XRap will go to the last page where you can open the directory of where your tar.bz2 file will be located, and your can close XRap.
Mac
- Open up XRap, and select where your XULRunner application (with the .app extension) is located, and click next.
- Select the type of License you would like to attach to your application from the drop-down list of available licenses. You can optionally select your own license, or no license at all. Once you have selected your license option, click next

- XRap will now package your application into a dmg.
- When successfully completed, XRap will go to the last page where you can open the directory of where your dmg file will be located, and your can close XRap.
I hope to release an updated version where you can create simple packages for different platforms. Similar to how you can create a zip file on Linux for distribution on Windows. My current plans are:
Windows:
- Create a zip file for release on Linux
- Create a zip file for release on Mac, I will have to refactor the directory structure so that it aligns with the Mac model
Linux
- Create a zip file for release on Mac, I will have to refactor the directory structure so that it aligns with the Mac model
Mac
- Create a zip file for release on both Windows and Linux
I plan to work on it over the summer, and hope to be compeleted within the next couple months. Please post any new bugs found on xrap.sourceforge.net.
Enjoy!


Great job, Joshua! A well planned and well executed project… truly inspiring.
Hope to be able to use XRap as soon as I learn to create XULRunner apps…
Thanks a lot Ashutosh! Learn XUL! its awesome once you get the hang of it
Josh
FYI, I just added XRap to the List of Mozilla-based Applications at
https://developer.mozilla.org/En/List_of_Mozilla-Based_Applications
If there is anything else missing on that list, feel free to add it or send me the information and I’ll update things.